Bolt Tensioning |
What is Bolt Tensioning?
Tensioning is the direct axial stretching of the bolt to achieve preload. Inaccuracies created through friction are eliminated. Massive mechanical effort to create torque is replaced with simple hydraulic pressure. A uniform load can be applied by tensioning multiple studs simultaneously.
Tensioning requires longer bolts, and a seating area on the assembly around the nut. Tensioning can be done using detachable Bolt Tensioners or Hydraulic Nuts.
* Preload (residual load) = Applied Torque
minus Frictional Losses *
What is Load Loss
Load loss is a loss of bolt elongation depending on factors such as thread deflections, radial expansion of the nut, and embedding of the nut into the contact area of the joint. Load loss is accounted for in calculation and is added to the preload value to determine the initial Applied Load. The preload depends on Applied Load and Load Loss (load loss factor).
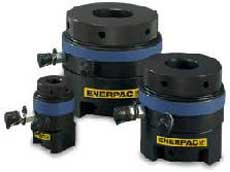
Tensioning operation
Tensioning permits the simultaneous tightening of multiple bolts; the tools are connected in sequence via a high-pressure hose assembly to a single pump unit. This ensures each tool develops the exact same load and provides a uniform clamping force across the joint. This is especially important for pressure containing vessels requiring even gasket compression to affect a seal.
General Procedure
- Step 1.. The bolt tensioner is fitted over the stud
- Step 2.. Hydraulic pressure is applied to the tensioner which then stretches the stud
- Step 3.. The stud's nut is wound down against the joint face
- Step 4.. Pressure is released and the tool removed
The bolt behaves like a spring, when the pressure is released the bolt is under tension and attempts
to contract, creating the required clamping force across the joint.
Less than 100% tensioning
Not all applications allow for the simultaneous fit of a tensioning device on each bolt, in these cases at least two tensioning pressures are applied. This is to account for a load loss in those bolts already tensioned as the next sets are tightened. The load losses are accounted for in calculation and a higher load is applied to allow the first sets to relax back to the target preload.
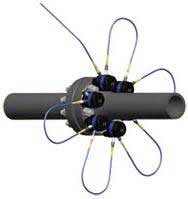
Set-up using a 50% tensioning procedure. Half the bolts are tensioned simultaneously, the tools are relocated on the remaining bolts and they are subsequently tensioned.
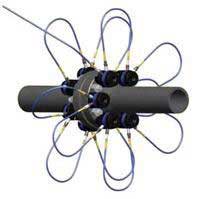
Set-up using a 100% tensioning procedure. All bolts are tensioned simultaneously.
Preparation flange bolt-up
In a flanged connection, all components must be correct to achieve a seal. The most common cause of leaky gasketed joints is improper installation procedures.
Before beginning a bolting process, the following preliminary steps will avoid future problems..
- Clean the flange faces and check for scars; the faces must be clean and free of defects (burrs, pits, dents, etc.).
- Visually inspect all bolts and nuts for damaged or corroded threads. Replace or repair bolts or nuts as necessary.
- Remove burrs from all threads.
- Lubricate the threads of the bolt or stud, and the surface of the nut face adjacent to the flange or washer. Hardened washers are recommended in most applications.
- Install the new gasket and be sure gasket is properly centered. DO NOT REUSE old gasket, or use MULTIPLE gaskets.
- Check flange alignment ASME B31.3 Process Piping..
...flange faces must be parallel within 1/16" per foot of diameter, and flange bolt holes must be aligned to within 1/8" maximum offset. - Adjust the position of the nuts to insure that 2-3 threads is visible above the top of the nut.
Irrespective which method of tightening is used, above determined checks and preparations always must be done.
Remark(s) of the Author...
My own experiences about...Torque Wrenches
- In the past I have assembled hundreds leak-free flange connections, from NPS 1/2 to NPS 24
and bigger. Rarely I have used therefore a Torque Wrench.
In practice, "normal" pipe flange connections are almost never assembled with a Torque Wrench. The difficultest connections for me always were the "little ones" and then especially the Raised Face type above Class 300 (RF Height = approximately 6.4 mm).
Relationable the flange faces from a NPS 1/2 flange are smaller then for example a NPS 6 flange, and the chance on misalignment, in my view is much bigger.
In practice I encounter regularly flange connections, where the alignment do not in the tolerance limit. If simply the order of Tightening Procedure is followed the Mechanic is not well busy. Possibly must be begun on bolt six instead of on bolt one. Use your eyes during flange assembly, it is very important and contributes very probably to a leak-free connection
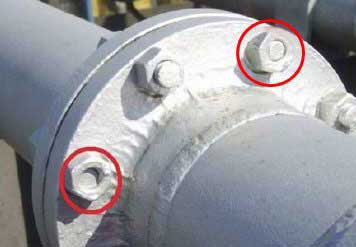
Improper flange connections
the bolts are too short!
What can you do..
- The picture show a improperly bolted flange, because two bolts are too short, and the nuts are not completely on the bolts. This means that the joint may not be as strong as it should be. Flanges are designed so that the entire nut-bolt combination holds the forces on the flange. If the nut is only partially screwed onto the bolt, the connection may not be strong enough.
- If your job includes putting equipment together, assembling flanged pipe, bolting manhole covers or other bolted connections on equipment, or other equipment assembly, remember that the job is not complete until all of the bolts are properly installed and tightened.
- Some equipment requires special bolt tightening procedures. For example, you may have to use a torque wrench to correctly tighten the bolts to the specification, or tighten the bolts in a special order. Make sure that you follow the correct procedure, use the correct tools, and that you are properly trained in the equipment assembly procedure.
- Check pipes and equipment for properly bolted flanges as part of your plant safety inspections. As simple guidance, bolts that do not extend beyond the nuts should be reviewed by a plant piping craftsman or engineer.
- If you observe improperly bolted flanges in your plant, report them so they can be repaired, and make sure the required repairs are completed.
- Inspect new equipment, or equipment which has been re-assembled after maintenance, to make sure it is correctly assembled and properly bolted before starting up.
What is the proper length of a Stud Bolt?
As a rule, you can use.. The free threads of the bolt above the top of the nut is equals to 1/3
times the bolt diameter.
Related Post(s)
Before using a given torque table, these assumptions should be verified to insure they are appropriate for the specific application...