 |
Rockwell Hardness Testing |
Hardness is a characteristic of a material, not a fundamental physical property. It is defined as the resistance to indentation, and is determined by measuring the permanent depth of indentation. Put more simply, when using a fixed force (load) and a given indenter, the smaller the indentation, the harder the material.
Indentation hardness value is obtained by measuring the depth or the area of the indentation using different test methods.
The Rockwell hardness test method, as defined in ASTM E-18, is the most commonly used hardness test method.
The Rockwell test is generally easier to perform and more accurate than other hardness methods. The Rockwell test method is used on all metals except in circumstances where the test metal structure or surface condition would introduce too many variations; where the indentations would be too large for the application; or where the sample size or shape prohibits its use.
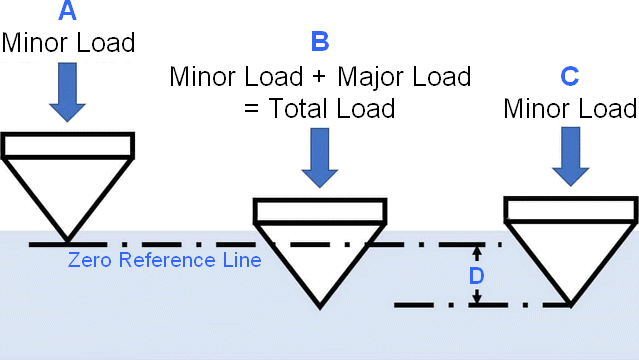
The Rockwell method measures the permanent depth of indentation caused by a force/load on an indenter. First, a preliminary test force (commonly called preload or small load) is applied to a specimen using a diamond or ball indenter. This preload breaches the surface to reduce the effects of the surface finish. After the preliminary test force is held for a specified time, the base depth of indentation is measured.
After the pre-load, an additional load, called the main load, is added to achieve the total required test load. This force is held for a predetermined time (dwell time) to allow elastic recovery. This large force is then released, returning the force to the preliminary load. After holding the preliminary test force for a specified time, the final indentation is measured. The Rockwell hardness value is derived from the difference between the base and final indentation measurements. This distance is converted into a hardness number. The preliminary test force is removed and the indenter is removed from the specimen.
Preliminary test loads (preloads) range from 3 kgf (used in the "Superficial" Rockwell scale) to 10 kgf (used in the "Regular" Rockwell scale). Total test forces range from 15 kgf to 150 kgf (superficial and regular) to 500 to 3000 kgf (macrohardness).
Test Method Illustration
A = Depth reached by indenter after application of preload (small load).
B = Position of indenter during total load, small plus large load.
C = Final position reached by indenter after elastic recovery of sample material.
D = Measured distance representing the difference between the pre-load and the position of the large load. This distance is used to calculate the Rockwell hardness number.

A variety of indenters can be used: conical diamond with a round tip for harder metals to ball indenters ranging in diameter from 1/16in to 1/2in for softer materials.
When choosing a Rockwell measurement scale, a general guideline is to choose the scale that allows the largest load and indenter without exceeding the defined operating conditions and taking into account conditions that may affect the test result. These conditions include specimens that are below the minimum thickness for depth of indentation; a specimen impression that falls too close to the edge of the specimen or another impression; or testing on cylindrical specimens.
In addition, the test shaft must be within 2 degrees of plumb to ensure accurate loading; there must be no deflection of the specimen or tester during load application due to conditions such as dirt under the specimen or on the lifting screw. It is important to keep the surface clean and decarburization from heat treatment should be removed.
Sheet metal may be too thin and soft to test on a given Rockwell scale without exceeding the minimum thickness and possibly damaging the test window. In this case, a diamond anvil can be used to consistently affect the result.
Another special case when testing cold-rolled sheet steel is that hardening can create a gradient of hardness through the sample, so each test measures the average of the hardness over the depth of indentation. In this case, any Rockwell test result will be subject to doubt because there is often a history of testing with a particular scale on a particular material that operators are accustomed to and can functionally interpret.
Reference(s) ..www.hardnesstesters.com
Regular Rockwell hardness scale chart
| Rockwell Scale Symbol | Type of Indenter Diameter in case of Ball | Minor Load | Major Load | Typical use |
| HRA | Spherical diamond | 98.07 N (10 kgf) | 588.4 N (60 kgf) | Cemented carbides, thin steel, and shallow case hardened steel |
| HRB | Ball, 1.588 mm (1/16 inch) | 98.07 N (10 kgf) | 980.7 N (100 kgf) | Copper alloys, soft steels, aluminum alloys, malleable iron, etc. |
| HRC | Spherical diamond | 98.07 N (10 kgf) | 1471 N (150 kgf) | Steel, hard cast irons, pearlitic malleable iron, titanium, deep case hardened steel, and other materials harder than 100 on the Rockwell B scale. |
| HRD | Spherical diamond | 98.07 N (10 kgf) | 980.7 N (100 kgf) | Thin steel and medium case hardened steel, and pearlitic malleable iron |
| HRE | Ball, 3.175 mm (1/8 inch) | 98.07 N (10 kgf) | 980.7 N (100 kgf) | Cast iron, aluminum and magnesium alloys, and bearing metals |
| HRF | Ball, 1.588 mm (1/16 inch) | 98.07 N (10 kgf) | 588.4 N (60 kgf) | Annealed copper alloys, and thin soft sheet metals |
| HRG | Ball, 1.588 mm (1/16 inch) | 98.07 N (10 kgf) | 1471 N (150 kgf) | Malleable irons, copper-nickel-zinc and cupronickel alloys |
| HRH | Ball, 3.175 mm (1/8 inch) | 98.07 N (10 kgf) | 588.4 N (60 kgf) | Aluminum, zinc, and lead |
| HRK | Ball, 3.175 mm (1/8 inch) | 98.07 N (10 kgf) | 1471 N (150 kgf) | Bearing metals and other very soft or thin materials |
| HRL | Ball, 6.350 mm (1/4 inch) | 98.07 N (10 kgf) | 588.4 N (60 kgf) | Bearing metals and other very soft or thin materials |
| HRM | Ball, 6.350 mm (1/4 inch) | 98.07 N (10 kgf) | 980.7 N (100 kgf) | Bearing metals and other very soft or thin materials |
| HRP | Ball, 6.350 mm (1/4 inch) | 98.07 N (10 kgf) | 1471 N (150 kgf) | Bearing metals and other very soft or thin materials |
| HRR | Ball, 12.70 mm (1/2 inch) | 98.07 N (10 kgf) | 588.4 N (60 kgf) | Bearing metals and other very soft or thin materials |
| HRS | Ball, 12.70 mm (1/2 inch) | 98.07 N (10 kgf) | 980.7 N (100 kgf) | Bearing metals and other very soft or thin materials |
| HRV | Ball, 12.70 mm (1/2 inch) | 98.07 N (10 kgf) | 1471 N (150 kgf) | Bearing metals and other very soft or thin materials |
Basic principle and practical procedure of the Rockwell hardness test
Typical Rockwell Hardness Values
| Rockwell Scale Symbol | Type of Indenter Diameter in case of Ball | Minor Load, N (kgf) | Major Load, N (kgf) | Typical use |
| 15N | Spherical diamond | 29.42(3) | 147.1 (15) | Similar to A, C, D scales in table-1 but for thinner gage material |
| 30N | Spherical diamond | 29.42(3) | 294.2 (30) | Similar to A, C, D scales in table-1 but for thinner gage material |
| 45N | Spherical diamond | 29.42(3) | 441.3 (45) | Similar to A, C, D scales in table-1 but for thinner gage material |
| 15T | Ball; 1.588 mm (1/16 inch) | 29.42(3) | 147.1 (15) | Similar to B, F, G scales in table-1 but for thinner gage material |
| 30T | Ball; 1.588 mm (1/16 inch) | 29.42(3) | 294.2 (30) | Similar to B, F, G scales in table-1 but for thinner gage material |
| 45T | Ball; 1.588 mm (1/16 inch) | 29.42(3) | 441.3 (45) | Similar to B, F, G scales in table-1 but for thinner gage material |
| 15W | Ball; 3.175 mm (1/8 inch) | 29.42(3) | 147.1 (15) | Very Soft Material |
| 30W | Ball; 3.175 mm (1/8 inch) | 29.42(3) | 294.2 (30) | Very Soft Material |
| 45W | Ball; 3.175 mm (1/8 inch) | 29.42(3) | 441.3 (45) | Very Soft Material |
| 15X | Ball; 6.35 mm (1/4 inch) | 29.42(3) | 147.1 (15) | Very Soft Material |
| 30X | Ball; 6.35 mm (1/4 inch) | 29.42(3) | 294.2 (30) | Very Soft Material |
| 45X | Ball; 6.35 mm (1/4 inch) | 29.42(3) | 441.3 (45) | Very Soft Material |
| 15Y | Ball; 12.70 mm (1/2 inch) | 29.42(3) | 147.1 (15) | Very Soft Material |
| 30Y | Ball; 12.70 mm (1/2 inch) | 29.42(3) | 294.2 (30) | Very Soft Material |
| 45Y | Ball; 12.70 mm (1/2 inch) | 29.42(3) | 441.3 (45) | Very Soft Material |
Some typical values of Rockwell hardness
| Material | Rockwell Hardness Values |
| Very Hard Steel | HRC 55 to HRC 66 |
| Axes | HRC 45 to HRC 55 |
| Brass | HRB 55 to HRB 93 |
| Hard Impact Steel Blades | HRC 52 to HRC 55 |
OTHER TESTS OF (HARDNESS)

